Flow Control
The workflow editor supports flow control nodes that enable parallel execution, conditional branching, and looping within your HPC pipelines. Flow control nodes are available in the FLOW CONTROL section of the application sidebar and can be dragged onto the canvas just like application nodes.
Split and Join (Parallel Execution)
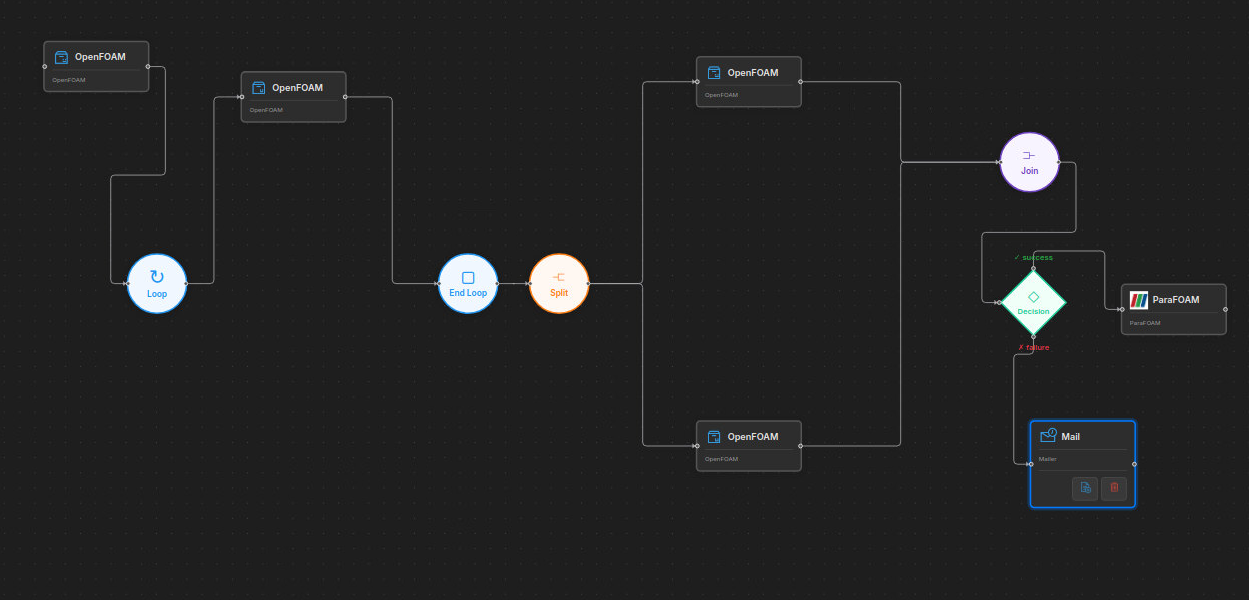
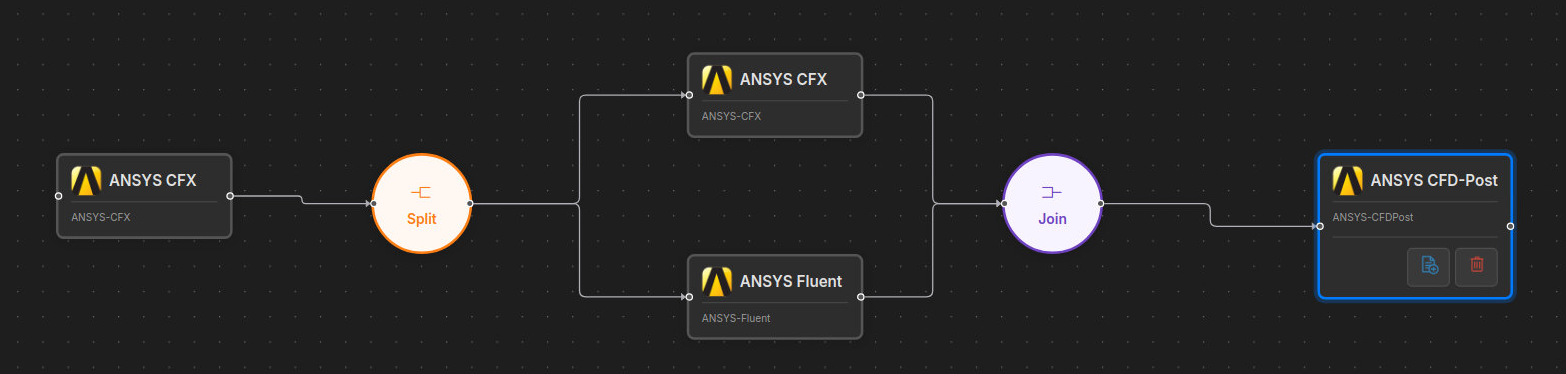
Split and Join nodes allow you to run multiple workflow branches in parallel. The Split node fans out to multiple branches, and the Join node waits for all branches to complete before continuing.
How It Works
- Drag a Split node onto the canvas after an application step.
- Connect the Split node to two or more application steps — these become parallel branches.
- Connect all branch endpoints to a Join node.
- Connect the Join node to any steps that should run after all branches complete.
Parallel Script Generation
When generating a bash script, each branch runs in a background sub-shell. The script waits for all branches to finish and checks their exit codes. If any branch fails, the workflow stops.
A Join node requires at least one Split node to already exist on the canvas. Similarly, a Split node requires at least one application step before it.
Decision (Conditional Branching)
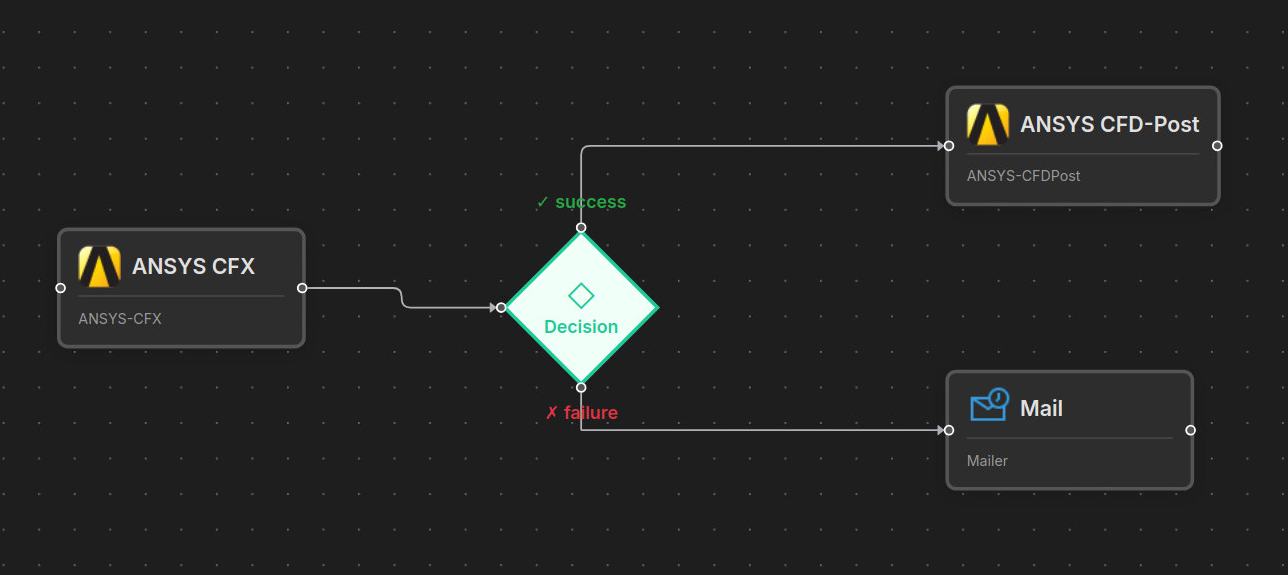
Decision nodes allow your workflow to take different paths based on whether the preceding step succeeded or failed.
How It Works
- Drag a Decision node onto the canvas after an application step.
- Connect it to two different steps using the on-success (green) and on-failure (red) handles.
- The workflow follows the success path if the preceding step exited with code 0, or the failure path otherwise.
Decision Script Generation
Decision nodes generate standard bash if/else blocks.
Decision nodes cannot be placed directly after a Split node because a Split has no exit code to evaluate.
Loop (Iterative Execution)
Loop Start and Loop End nodes allow you to repeat a set of workflow steps for each item in a list. This is useful for parameter sweeps, mesh refinement studies, or batch processing of multiple input files.
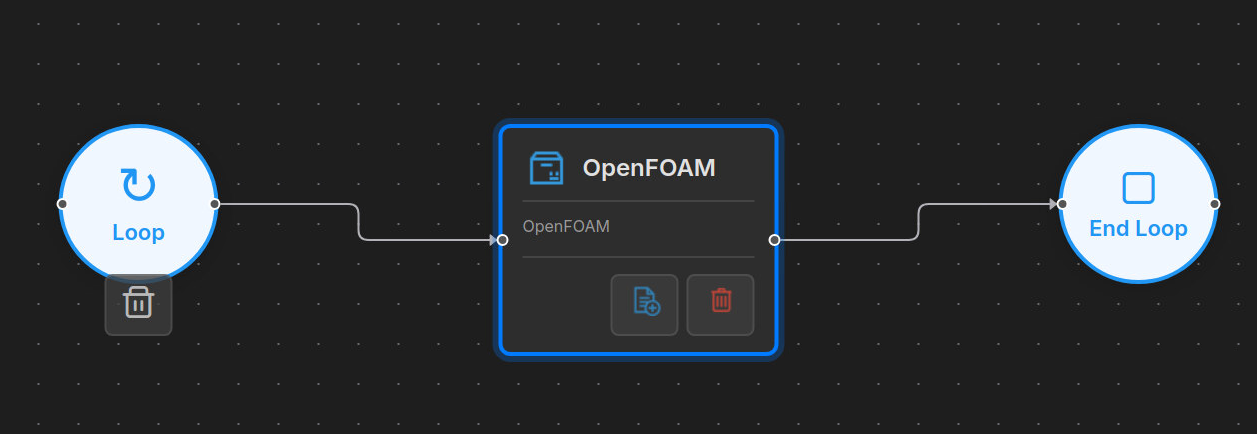
How It Works
- Drag a Loop Start node onto the canvas. A configuration dialog opens immediately.
- Configure the loop (see below).
- Connect the Loop Start to one or more application steps that form the loop body.
- Drag a Loop End node and connect it after the last step in the body.
- Any steps connected after the Loop End run once after all iterations complete.
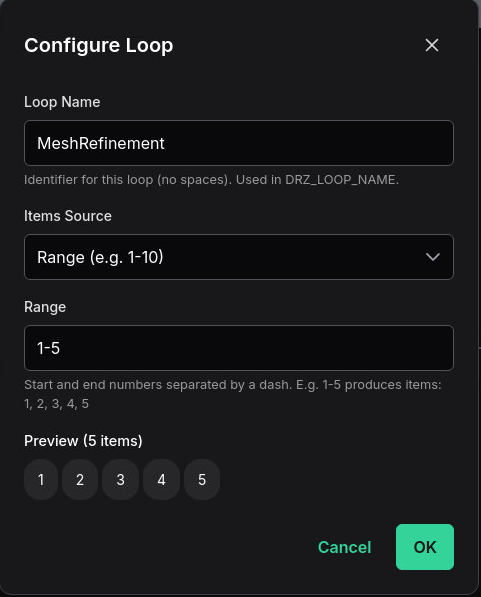
Loop Configuration
The Loop Start configuration dialog offers three modes for specifying iteration items:
| Mode | Input | Example |
|---|---|---|
| Range | Start-End numbers | 1-10 produces items 1, 2, 3, ... 10 |
| Comma-separated list | Comma-delimited values | coarse, medium, fine |
| File | Path to a text file | /data/inputs/meshes.txt (one item per line) |
Each loop also requires a Loop Name (no spaces), which is used in the DRZ_LOOP_NAME environment variable and helps identify the loop in log output.
Loop Environment Variables
Inside the loop body, the following environment variables are automatically set for each iteration and are available to all application steps:
| Variable | Description | Example Value |
|---|---|---|
DRZ_LOOP_NAME | The user-defined loop name | MeshRefinement |
DRZ_LOOP_ITEM | The current item for this iteration | fine |
DRZ_LOOP_ITER | Zero-based iteration index | 0, 1, 2, ... |
DRZ_LOOP_TOTAL | Total number of items in the loop | 10 |
Using Loop Variables in Your Scripts
You can reference these variables in your application scripts to customize behavior per iteration. For example, an OpenFOAM script might use DRZ_LOOP_ITEM to select a different mesh:
The example below shows a simple BASH script, but, generally, the custom scripts created by users would be wrapper scripts which internally generate job submission scripts to the underlying job scheduling system.
#!/bin/bash
# Inside a loop body step
echo "Processing mesh: $DRZ_LOOP_ITEM (iteration $DRZ_LOOP_ITER of $DRZ_LOOP_TOTAL)"
cp meshes/${DRZ_LOOP_ITEM}.msh case/constant/polyMesh/
cd case
blockMesh
simpleFoam
Loop Script Generation
For range and list modes, the script generator produces a bash for loop.
For file mode, the script uses a while read loop that reads items at runtime.
Editing a Loop
To change a loop's configuration after placing it, click on the Loop Start node to reopen the configuration dialog.
Loop Rules and Constraints
- Every Loop Start must have a matching Loop End.
- A Loop Start must have exactly one outgoing connection (to the loop body).
- A Loop End must have exactly one incoming connection (from the last body step).
- Split/Join inside a loop is allowed — you can run parallel branches within each iteration.
- Loops inside Split/Join branches are not allowed — keep loops outside of parallel regions.
- If any step inside the loop body fails, the loop stops immediately and the workflow reports a failure.
A workflow can start with a Loop Start node. This is useful when the entire workflow is a parameter sweep or batch process.
Validating Workflows
Before running or exporting a workflow that uses flow control nodes, you can verify that all connections are correct by clicking the Validate button (check-circle icon) in the workflow editor toolbar.

The validator checks for:
| Check | Error shown if... |
|---|---|
| At least one node exists | The canvas is empty |
| All nodes connected | Any node has no incoming or outgoing edges |
| Split has 2+ outgoing connections | A Split has fewer than 2 branches |
| Join has 2+ incoming connections | A Join has fewer than 2 branches merging |
| Decision has exactly one on-success and one on-failure edge | A Decision is missing a branch |
| Decision does not follow a Split directly | A Decision is connected right after a Split (Split has no exit code to evaluate) |
| Split does not follow a Join directly | A Split is connected right after a Join (place an application step between them) |
| Loop Start has exactly 1 outgoing connection | A Loop Start fans out to multiple paths |
| Loop Start is configured | A Loop Start has no name or items |
| Loop End has exactly 1 incoming connection | A Loop End merges multiple paths |
| Loop Start / Loop End counts match | There are unmatched loop boundaries |
| No loops inside Split/Join branches | A Loop Start is placed inside a parallel branch |
If the workflow passes all checks, a success message is displayed. Validation also runs automatically before Start, Save, Export, and Script actions.
Use the Validate button frequently while building complex workflows with nested flow control. It is much easier to fix connection issues early than after the workflow has grown large.
Flow Control Nodes Summary
| Node | Icon | Color | Purpose |
|---|---|---|---|
| Split | Parallel arrows | Orange | Fan out to parallel branches |
| Join | Converging arrows | Orange | Wait for all parallel branches |
| Decision | Question mark | Amber | Branch on success/failure |
| Loop Start | Circular arrow | Blue | Begin iterating over items |
| Loop End | Stop icon | Blue | Mark end of loop body |
Combining Flow Control
Flow control nodes can be combined to build complex workflows. For example:
- A loop containing a split/join runs parallel branches on every iteration.
- A decision after a step inside a loop body can handle per-iteration error recovery.
- Steps after a loop end can aggregate results from all iterations.